Please enable Javascript for better experience...
 
vSphere 6.0 - Configure and Manage Resource Pools
By Pranay Jha | Jul 27, 2016 | In Tutorials | Update: Jul 27, 2016 | Total Views [ 12390 ]
Taged In
(2 Like)
Rate

Our Virtual Infrastructure is running on resources being distributed by hypervisor. Although Hypervisor is itself smart in allocating resources, avoid resource contention, and maximizing the performance as per requirement. However, we as VM administration are also responsible and have to  manage the better utilization and optimization of resource to ensure to have better Availability, Manageability, Performance, Recoverability, and Scalability of infrastructure.

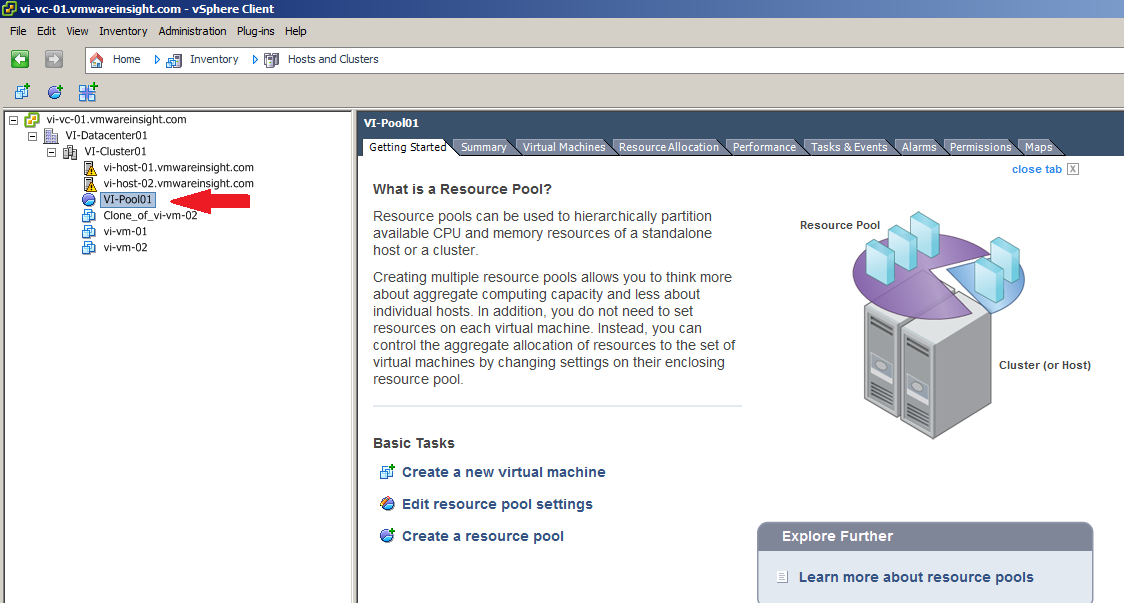
In this article, we are going to cover topic for better utilization of resources and maximizing the performance by using Resource Pool

Configure and Manage Resource Pools:-

Resource pool is a logical abstractions of CPU and Memory resources. We use Resource Pool to Share, Limit, and Reservation of resources for VMs.  We need it when CPU and Memory resources become constrained on the cluster, or we need to dedicate amount of resources for list of virtual machines. Although it can also be allocated per VM, but management of resource per Virtual machine will increase administration efforts.

You must have DRS enabled on Cluster before creating Resource Pool. To get DRS features, you should have Enterprise or Enterprise Plus License. So anyway, we can enable Resource Pool when we have at least vSphere Enterprise version of license available.

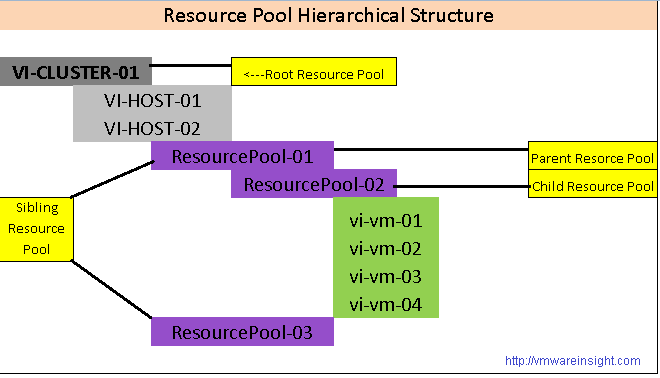
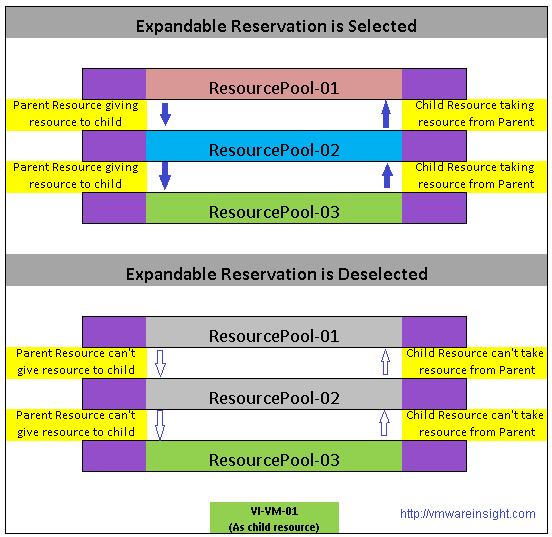
Resource Pool provides better allocation of CPU and Memory resources by using below parameters as per requirement. Resource Pool has Parents, Children, and Siblings in Resource Pool Hierarchy.

Before configuring it, you have to priorities your virtual machines and have to aware the goals of it. Accordingly configure it, that would give you better optimization.

  • Shares
  • Reservation
  • Limit

Let's have a quick insight about these allocation types.

Shares:-

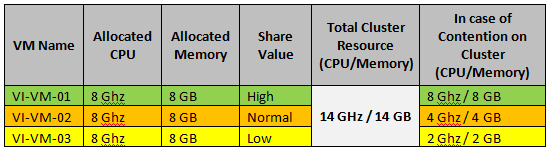
As name says, it share the resources among Virtual machines. It distribute resource as per the set priorities. There are three type of priorities in Shares Value as mentioned below, which works in 4:2:1 ratio, though it can be customized.

  • High - 100
  • Normal - 50
  • Low - 25

Share value comes in to the picture only if there is resource contention on Cluster. If Virtual machine configured with Share Value as High, it will take the priority over others.

Let's take a scenario to know insight how this Share ratio works.

  • Suppose your cluster is running with total resource as 14GHz CPU and 14GB of Memory. There are 3 VMs running in cluster with configured share value as High, Normal, and Low as shown below. VMKernel will keep allocating resources normally as per requirement unless there is contention on Cluster. However if contention occurs, It will allocate resources as per defined share values. In below example, 1 Virtual machines are running as High, and other 2 are running as Normal and Low. We have total 14Ghz and 14GB CPU/Memory exist on cluster. As default Share value works in 4:2:1 ratio, it will allocate resource double of Normal VM(VI-VM-02) to VI-VM-01, and half to VI-VM-03.


Reservation:-

Reservation defines the guarantee allocation of resource to Virtual Machine even if there is contention on Cluster. Virtual Center only allow to power on VM only if there are enough  resources available according to meet the requirement of Virtual Machine reservation.

Take a scenario here to better understand reservation on VM.

  • Suppose you have three Virtual Machines, out of which two are running without reservation, and one VM(vi-vm-03) is running with 4 GB of reservation. Total memory on cluster is 14GB. If reservation of 4GB memory is enabled one VM, you will only get rest 10GB(14GB - 4GB) of Memory for over commitment on other Virtual Machines in cluster. Hypervisor will not distribute reserved memory to other VMs. Even if there is contention on Cluster, Virtual Machine running with reserved memory would not impact. Reservation guarantees the concurrent usage of resource to VM.
  • In another scenario, if you are configuring reservation of 4 GB on Resource Pool, and you are running with three Virtual Machines in that Resource Pool. VM1 is consuming 1GB, VM2 is consuming 0.5GB, VM3 can use 2.5GB concurrent memory.

Limit:-

Limit specify the capping and upper bound of Virtual Machine resource usage. It's same as you configure I/O control on Network and Storage, you have Limit feature which configure the upper bound of resource usage. However, you can allocate more resources to Virtual Machines then it's configured as Limit, but that will be useless for VMs. Hypervisor can never allocate resources more than the limit, even if there are unused resources on the system.

Take a scenario to understand Limit.

  • Suppose you have three Virtual Machine, and one VM(vi-vm-02) is configured with Limit of 2 GB Memory. And current allocated memory on VM is 4GB, it will only be able to use 2GB Memory maximum rather 4GB. Even if cluster have enough resources available, it won't allocate to Virtual machine more than configured limit.

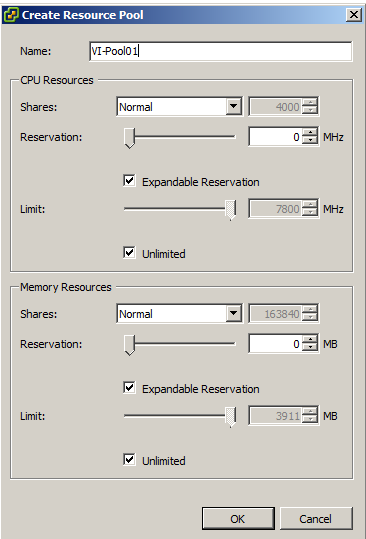
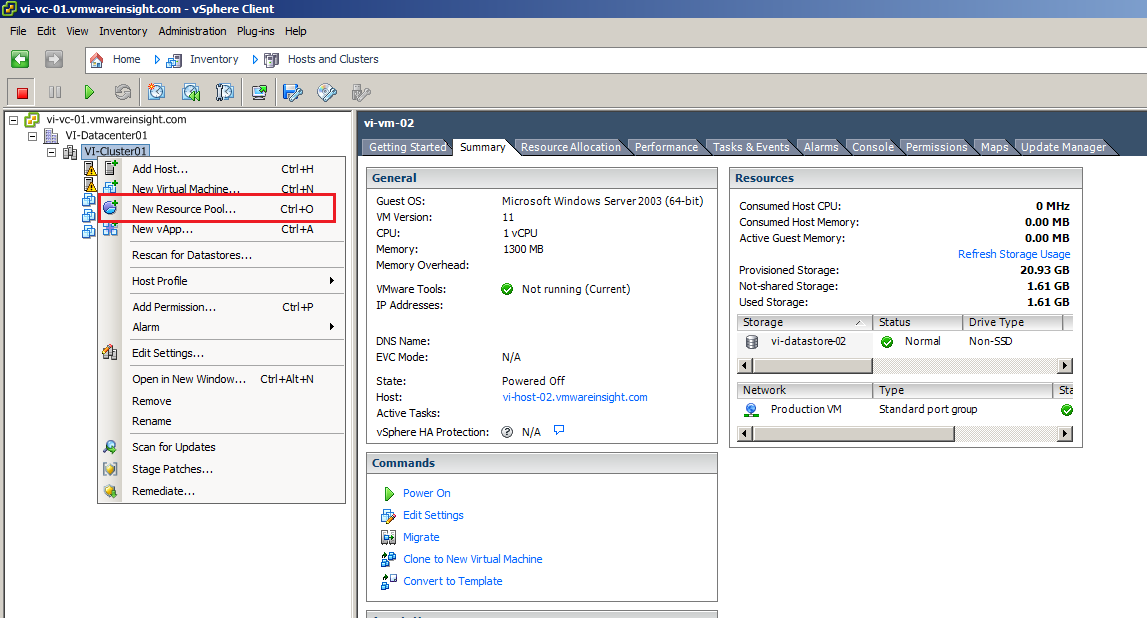
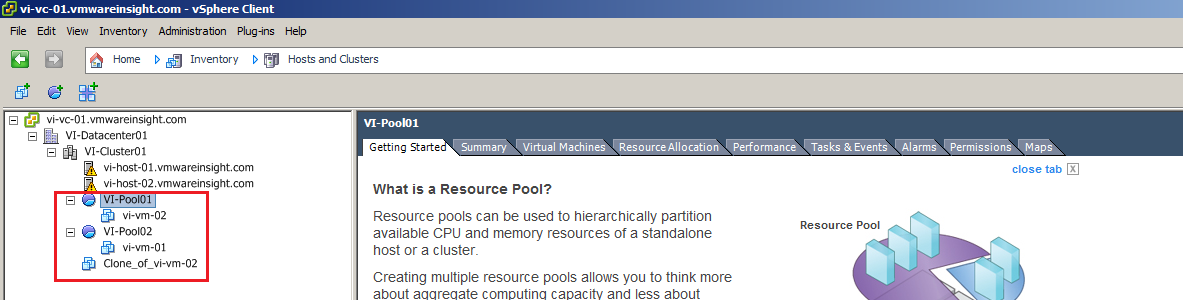
Well, we discussed an overview of Resource Pool. Now let's take insight how to configure it.

Step by Step Procedure for Configuring Resource Pool:-

  • Login to Virtual Center. Select Cluster in which you want to create Resource Pool.
  • Right Click on Cluster. Click on New Resource Pool.

  • Create Resource Pool  window will appear on screen. Give name of Resource Pool . In below example, we used VI-Pool01.
  • Configure CPU and Memory Share, Reservation, and Limit as per requirement. Click OK.
  • In Reservation tab, there is Expandable Reservation option which can be selected or deselected.
    • If Expandable Reservation is Checked, means Virtual machines and child pools can take resources from this parent pools.
    • If Expandable Reservation is Unchecked, means Virtual machines and child pools can take resources only from this pool, even if its parent has free resources.

  • When Resource Pool has created, it will be visible in inventory as shown below. Now you can move virtual machines by drag and drop, which you want to give allocation as per specified in Resource Pool.

  • Here we created two Resource pools as VI-Pool01 and VI-Pool02, and moved Virtual machines into this. Now these Virtual Machine's resources will be allocated and manage as per resource pool configuration.

Please note that you can also schedule the task to change the resource setting of Virtual Machine or Resource Pool as per requirement.

So, that's all from Resource Pool, we will move to next topic in next article.


Thanks for visiting here. Share this article if you found it useful.
Like Facebook Page https://www.facebook.com/VMwareInsight/
Connect to twitter https://twitter.com/imPranayK
Subscribe my Channel https://www.youtube.com/vmwareinsight
Connect over Linkedin https://in.linkedin.com/in/impranayk
Share this on Social Media

About the Author

Pranay Jha
Pranay Jha
Founder, Contributer VMwareInsight.com

Public profile: user/profile/99900000


Follow me

facebook linkedin twitter G+ VMTN youtube

Thank you for visiting my profile. I am Pranay Jha, bring along a total of 11+ years of extensive experience with me in Information Technology sector for organizations from small business to large enterprises, wherein my current assignment I am associated with IBM as a Technical Solution Architect for Virtualization platform. I am vExpert x 3 (16/17/18), VCIX-DCV, VCAP5/6-DCD, VCAP5-DCA, VCP7-CMA, VCP5/6-DCV, VCA-DCV, VCA-Cloud, VSP, VCE-CIA, MCITP, MCSE, MCSA(Messaging). I am also an Independent blogger and founder of http://vmwareinsight.com and https://cloudpathshala.com. I can be reached via email at pranay1988jha@gmail.com or Direct Message via Contact Us form.

 
Please SignUp/Login to comment...

Or comment as anonymous...
* Name
* Email ID
Comment
 
Sponsors


Facebook Likes