Please enable Javascript for better experience...
 
Adding a New Virtual Disk to a Virtual Machine in VMware Workstation
By Pranay Jha | Jul 14, 2016 | In Tutorials | Total Views [ 4237 ]
Taged In
(2 Like)
Rate

How to add new virtual disk to a virtual machine in VMware Workstation

Well, you might be knowing about adding disk to Virtual machine in VMware vSphere Environment. However there are some instances,  when you are using Type 2 Hypervisor i;e VMware Workstation, and quite possible that you may or may not be familiar with this.

Take a example if you are preparing virtual lab at your home and you don't have enough hardware servers to use for ESXi and vCenter roles. So, You will never wish to be in that situation where dependencies on hardware may turn you to drop your idea for lab preparation. So, to overcome this, you will use VMware Workstation software based hypervisor to virtualized your environment.

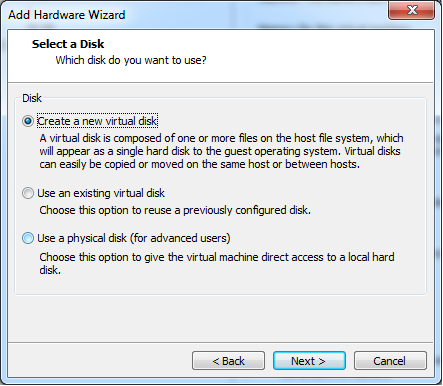
Once you have installed VMware Workstation in your local machine, you have to create Virtual Machines and ESXi hosts in VMware Workstation known as application based hypervisor, rather on physical hardware. Another question might have arose that how to allocate resources(i;e CPU, Memory, NIC, Disk)  to these virtual machines. Quite simple, just ensure to have enough resources on local machine, and you can further assigned to it from there itself. Take a example of previous article where we were required Storage Space for Openfiler Appliance which was running as Virtual Machine on VMware Workstation. Now we had to add Virtual Disk to this appliance so that it can be share and used for ESXi Environment.

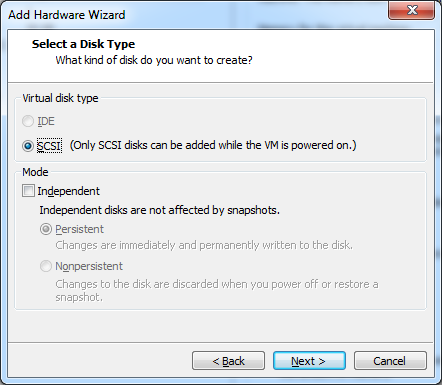
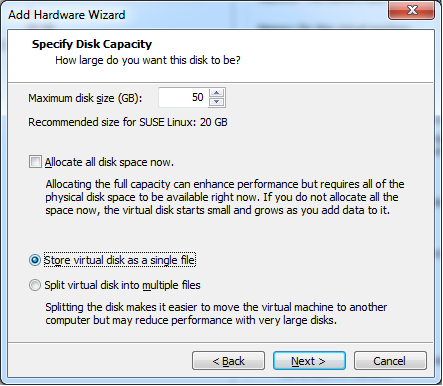
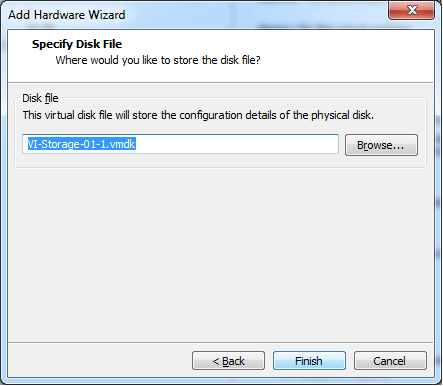
In this article, we will describe the procedure to Add Virtual Disk to VM in Type 2 Hypervisor. Let's take a quick insight below.

Step by Step Procedure to Add Virtual Disk:-


  • - Open VMware Workstation. It will list out the currently running Virtual Machines.

  • - Select Virtual Machine. Right Click and Edit.

  • - It will open Virtual Machine Setting option. Click on Add.

  • - Select Hardware Type as Hard Disk. Click on Next.

  • - Select a Disk "Create a new virtual disk" , Click Next.

  •  - Select Disk Type as SCSI. Click Next.

  •  - Provide Disk Capacity as per your requirement. In below example, We put 50 GB. This space will be taken by your local system. Click Next.

  •  - Select Disk File location. It will be store on your local machine. Click Finish.

  •  - Now 50GB Virtual Disk will be visible in Virtual Machine as additional Hard drive.


-----------------------------------------------

Thanks for vising here and giving your time to read out this article. Put your queries or inputs in comment box.

Be social and share if you liked this post.

Join my Facebook Group https://www.facebook.com/groups/VMwareInsight/

Like my Facebook Page https://www.facebook.com/VMwareInsight/


Thanks for visiting here. Share this article if you found it useful.
Like Facebook Page https://www.facebook.com/VMwareInsight/
Connect to twitter https://twitter.com/imPranayK
Subscribe my Channel https://www.youtube.com/vmwareinsight
Connect over Linkedin https://in.linkedin.com/in/impranayk
Share this on Social Media

About the Author

Pranay Jha
Pranay Jha
Founder, Contributer VMwareInsight.com

Public profile: user/profile/99900000


Follow me

facebook linkedin twitter G+ VMTN youtube

Thank you for visiting my profile. I am Pranay Jha, bring along a total of 11+ years of extensive experience with me in Information Technology sector for organizations from small business to large enterprises, wherein my current assignment I am associated with IBM as a Technical Solution Architect for Virtualization platform. I am vExpert x 3 (16/17/18), VCIX-DCV, VCAP5/6-DCD, VCAP5-DCA, VCP7-CMA, VCP5/6-DCV, VCA-DCV, VCA-Cloud, VSP, VCE-CIA, MCITP, MCSE, MCSA(Messaging). I am also an Independent blogger and founder of http://vmwareinsight.com and https://cloudpathshala.com. I can be reached via email at pranay1988jha@gmail.com or Direct Message via Contact Us form.

 
Please SignUp/Login to comment...

Or comment as anonymous...
* Name
* Email ID
Comment
 
Sponsors


Facebook Likes