Configuration Guide - Openfiler as Shared Storage in Virtual Environment Lab
Related Section: How to Install Openfiler to use as Shared Storage in Virtual Environment
As part of setting up Home Lab for virtual environment, we read about installation of Openfiler appliance in the previous article "Installation Guide - Openfiler as Shared Storage for Virtual Environment Lab". Let's move on to the configuration part and see how we can manage this appliance for accessing shared storage ESXi Hosts.
We can manage Openfiler appliance either through CLI or Graphical mode. To make it easy for starters, we will explain here about configuring block-level storage(iSCSi) and file-level storage(NFS ) through Graphical Interface.
Please note that it is one time configuration, and you don't have to repeat every time you add a new ESXi Host, unless allocated space on Openfiler storage has been occupied or you are adding Host in new Subnet which is not configured.
Let's take a quick look into the first view of direct console interface of this appliance. You will be able to see it after completing installation which we have explained in Installation Guide. Getting shared storage in ESXi hosts are just few clicks away. Why we are focusing more on to this because when shared storage will be allocated to hosts, you will be able get benefit of vSphere features, i;e High Availability, vMotion, Storage Cluster.
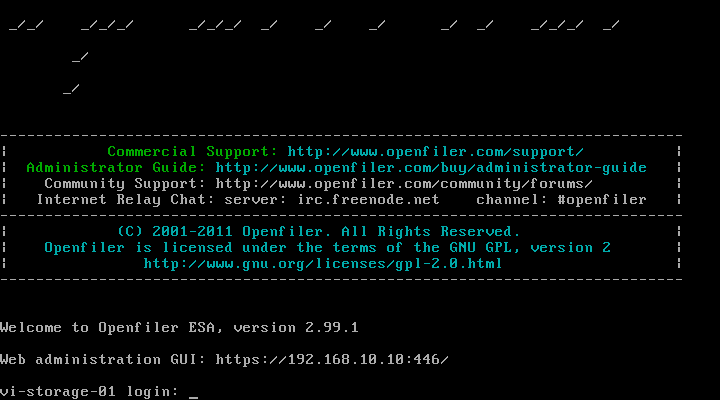
Open GUI console through web browser, and type (https://Openfiler_IPAdd:446/) to manage and configure it through graphical mode.
Brief of the tasks which we are going to perform in next clicks are as listed below. It's one time configuration and must required to make use of Openfiler appliance as Shared Storage; either block-level, or file-level.
- - Install Openfiler Appliance (Already completed in previous article)
- - Login to Appliance through Web browser.
- - Enable Required Services in Openfiler.
- - Verify Network Configuration and add Network Subnet for ESXi Hosts
- - Add additional disks as per Space requirement to Appliance.
- - Create Physical partitions volumes on disks attached to appliance.
- - Configure Block-level Storage(iSCSI):-
- - Create Volume Groups for iSCSI storage.
- - Add Partition Volumes in Volume Groups.
- - Configure iSCSI Targets in Openfiler.
- - Add Software iSCSI Adapter in ESXi.
- - Configure iSCSI Target in ESXi.
- - Add iSCSI Datastores in ESXi Host
- - Configure iSCSI Volumes to use as Shared Storage on ESXi
- - Create Volume Groups for iSCSI Volumes and NFS Volumes.
- - Configure Volume for iSCSI
- - Configure File-level Storage(NFS):-
- - Create Volume Groups for NFS storage.
- - Add Partition Volumes in Volume Groups.
- - Create NFS Share Folders to make available to ESXi Hosts.
- - Provide access to NFS share.
- - Add NFS Shares in ESXi Hosts.
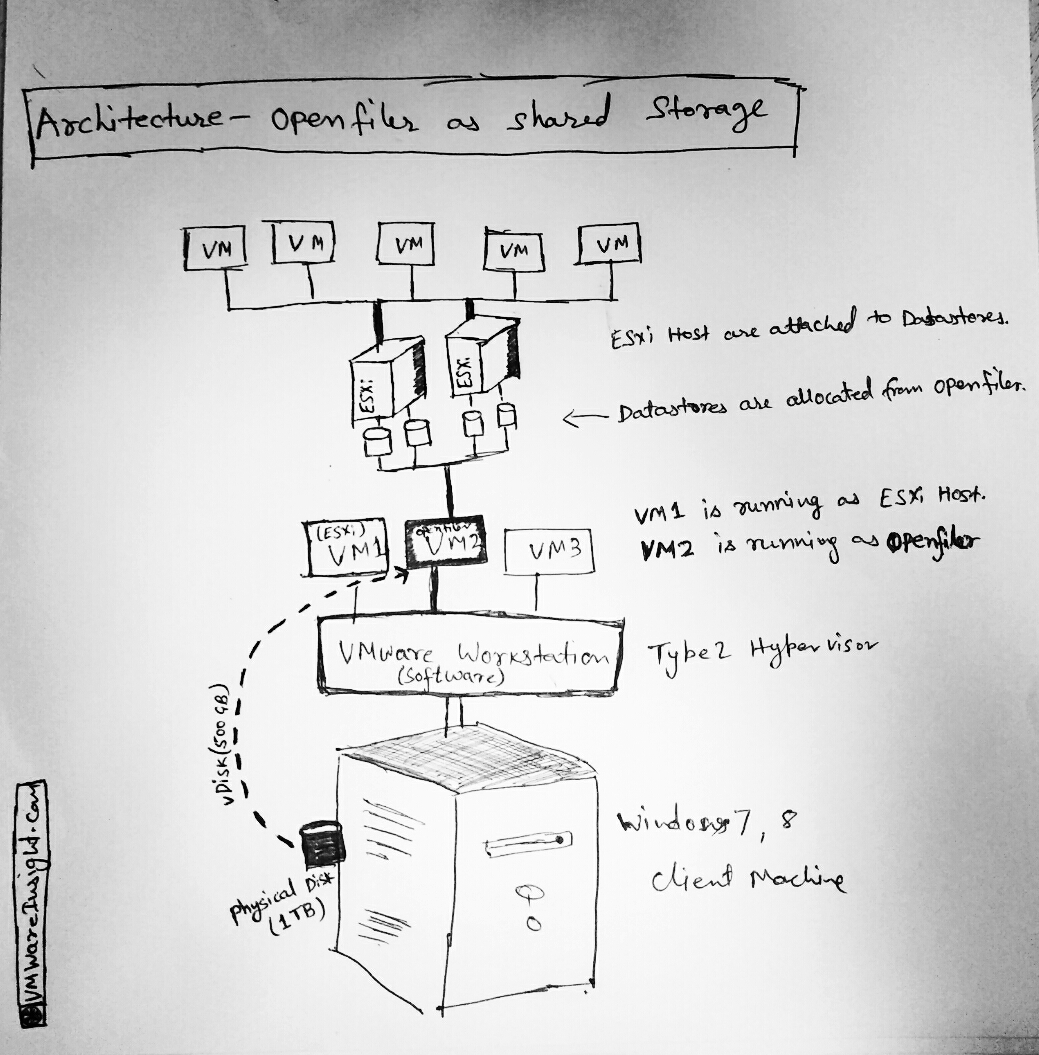
Now, first question may be come in your mind before configuring it is that how to allocate space to this storage appliance. To simplify this, I have segregated it in 5 layers starting from bottom to top as shown in below table. Let's take a quick insight here.
Architecture for Openfiler as Shared Storage:-
|
Layer#5
|
Virtual Machines in ESXi
|
VM hosted in datastores attached to ESXi Hosts.
|
|
Layer#4
|
ESXi Hosts
|
ESXi hosts are attached to datastores allocated from Openfiler appliance.
|
|
Layer#3
|
Openfiler Appliance
|
Openfiler appliance deployed as VM in Vmware Workstation. Storage space will be allocated as Virtual Disk through base machine hard disk.
|
|
Layer#2
|
VMware Workstation
|
On top of base machine, you will install Vmware Workstation Type2 Hypervisor.
|
|
Layer#1
|
Base Machine
|
Base machine running with any client operating system(Windows 7, 8).
|
How to Configure Openfiler:-
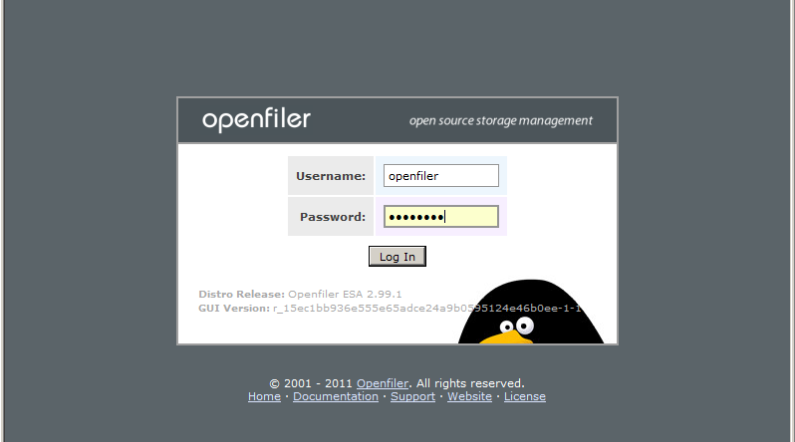
- - Login to Openfiler console by using IP address. Open web browser and type https://Openfiler_IPAdd:446/. Enter default user id and password as mentioned below.
- - Default User ID: openfiler
- - Default Password: password
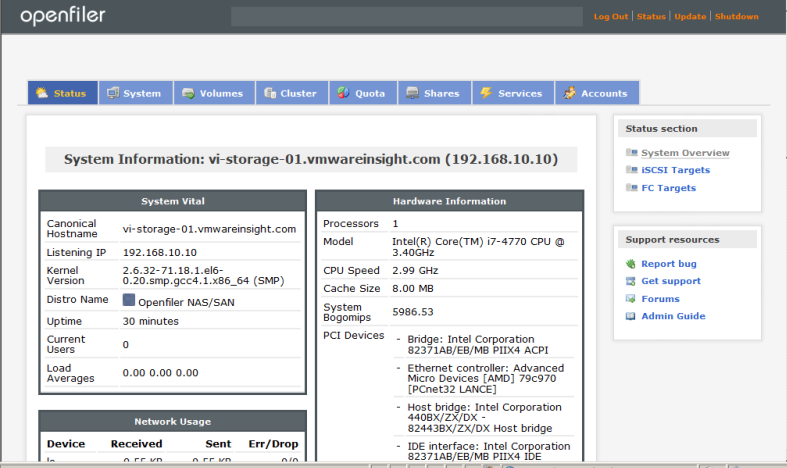
- - Below screen will appear which will show summary information of Openfiler.
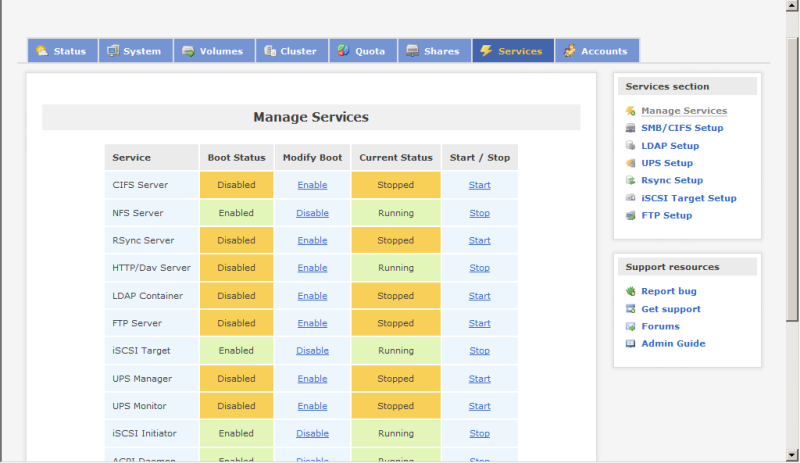
- - Go to Services tab and check if related services are running. If you want to access iSCSi and NFS storage, enable these services as shown in below figure.
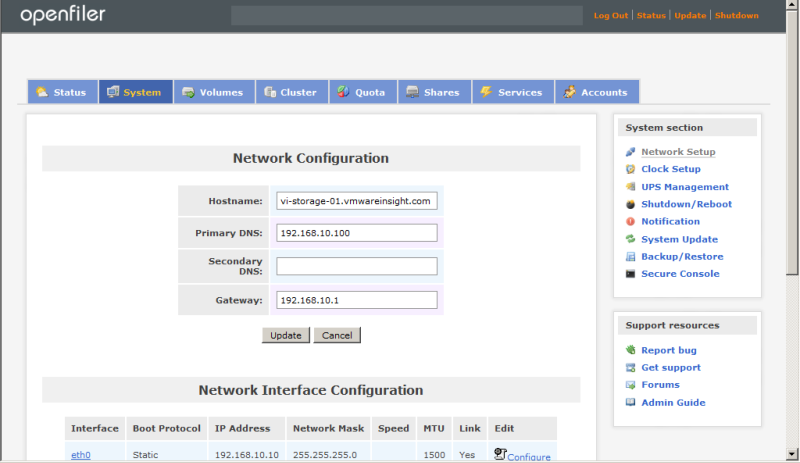
- - Verify network configuration settings in System tab.
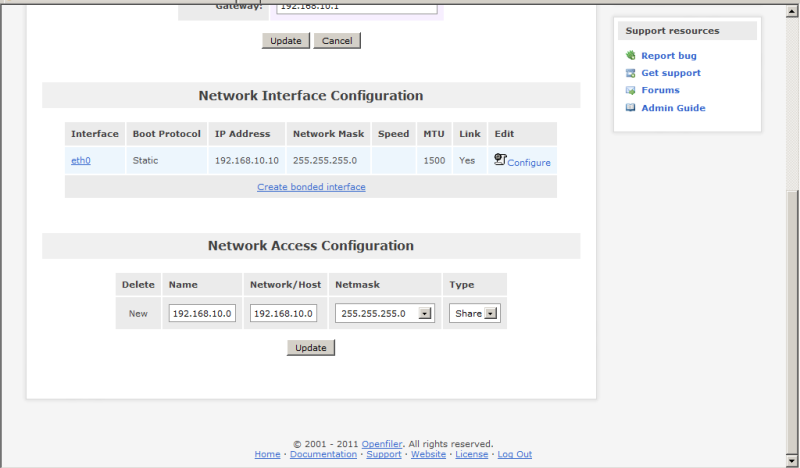
- - In Network tab, go to Network Access Configuration section, and add Subnet for ESXi hosts in which need access on shared storage. In below figure, I have added subnet for 192.168.10.0/24. Now hosts in this subnet will be able to access these shared storage.
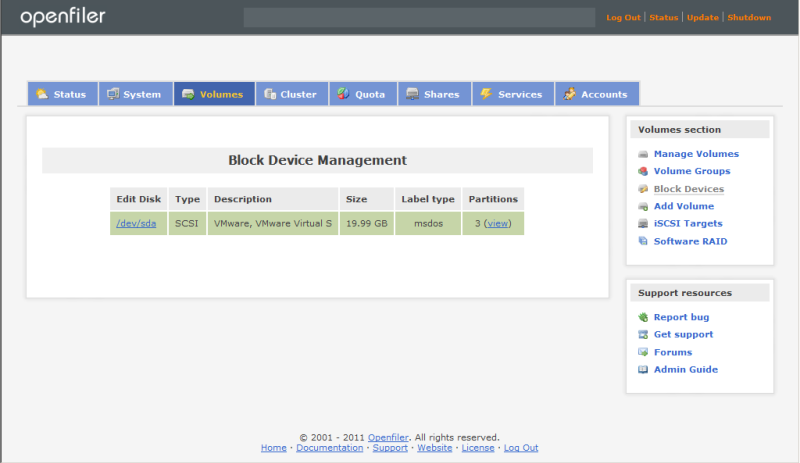
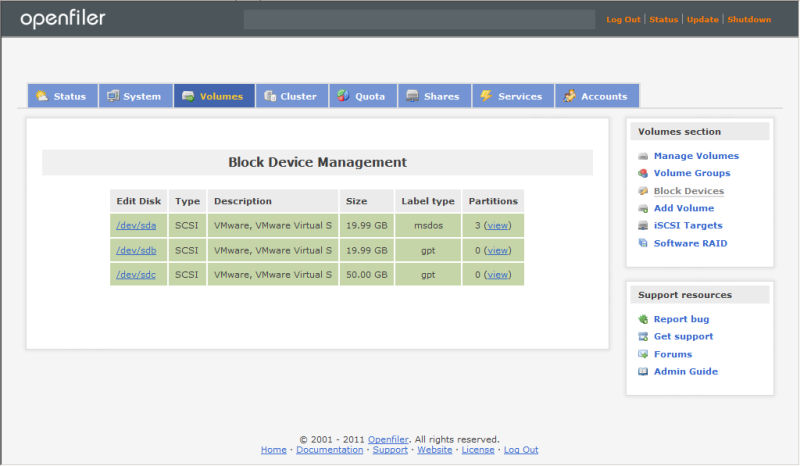
- - Go to Volumes tab and Click on Block Devices in right panel. Initially you will be able to see single disk which has assigned as boot drive. Now add addition vDisk as per your space requirement in this Openfiler appliance the same way you add in Virtual Machine.
<p >
#Reference: To know how to add disk in Openfiler appliance, Refer to section "Add Disk in Virtual Machine Running on VMware Workstation."
- - Refresh the console once you have added addition disks in appliance. You will be able to see that disks here in Block Device section. In below case, I have added two additional drives. Now you can use these disks to allocate datastores in ESXi hosts as shared storage. Before assigning it, you have to perform few more steps mentioned below.
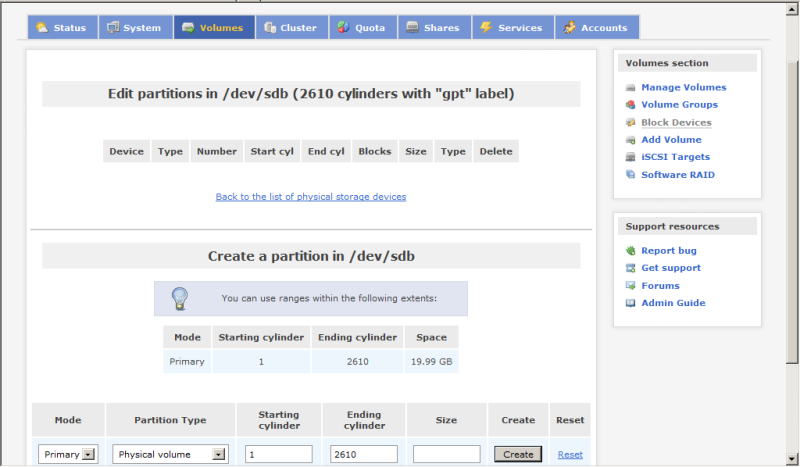
- - Click on one of the disk in above picture, and it will take you to create partition option. Refer to below section "Create a Partition". Provide required information and Click on Create. It will create the volume on disk /dev/sdb as per below image. Perform same steps for other disk which all are attached to this.
Configure Block-level Storage(iSCSI)
Configure Volume Group for iSCSI Volumes to use as Shared Storage in ESXi:-
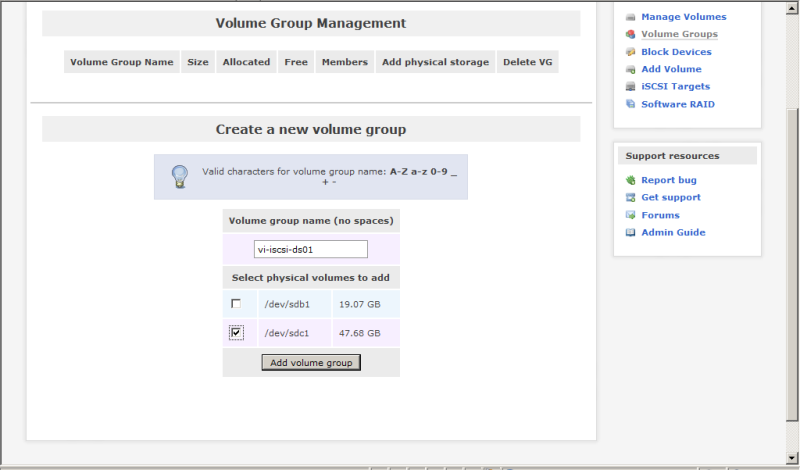
Earlier you created Physical Volumes using disks. Now you have to create Volume Groups using these volumes.
- - Click on Volume Groups in right panel to create groups.
- - Give Volume Group Name for iSCSI volumes in Create a new Volume Group section.
- - Select Physical Volume which you want to use for this group. (/dev/sdc1).
- - Click on Add Volume Group.
Add Volume for iSCSI:-
- - Go to Volumes tab. Click on Add Volume.
- - Select Volumes Group for iSCSi, Click on Change.
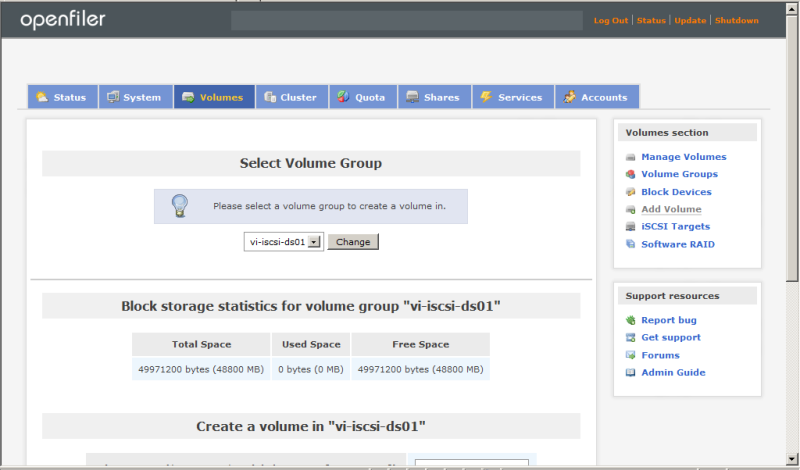
- - It will prompt to Create a Volume section. Provide required information as shown below.
- - Select Filesystem / Volume type as "block(iSCSI,FC,etc)" to use this volume as iSCSI target. Click Create to proceed.
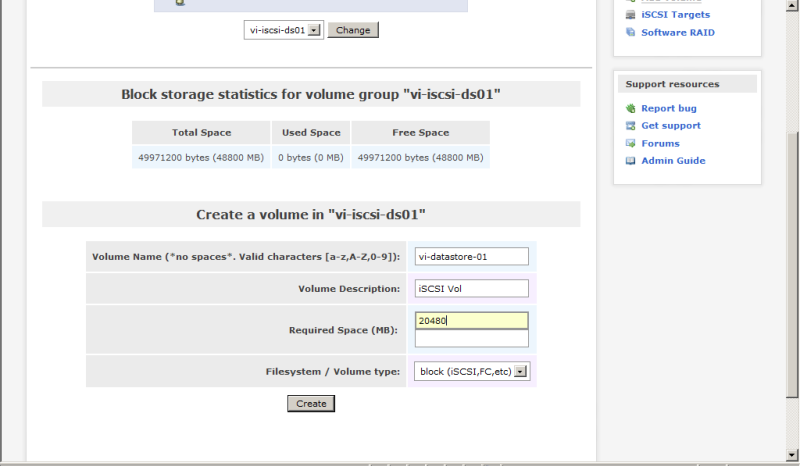
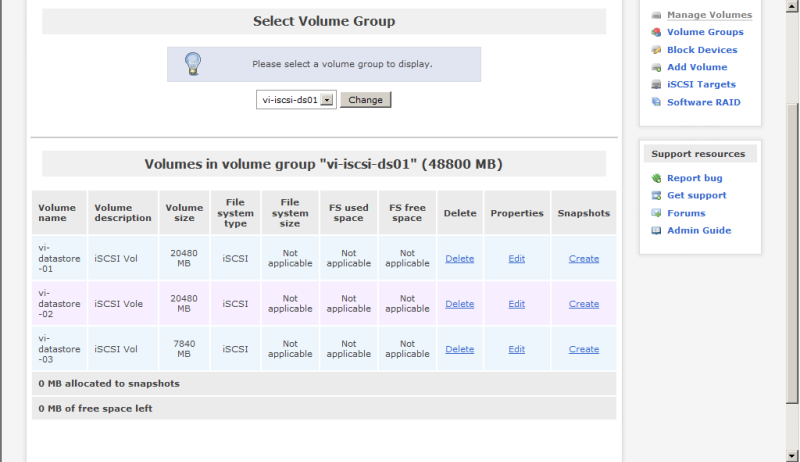
- - Refer below Volumes information, total space for Volume group is 50GB. We created one Volume called "vi-datastore-01" of 20 Gig size. You can create multiple Volumes in single Volume group.
- - Repeat same steps to create more iSCSI volumes as per requirement, shown in below figure.
Configure iSCSI Target in Openfiler:-
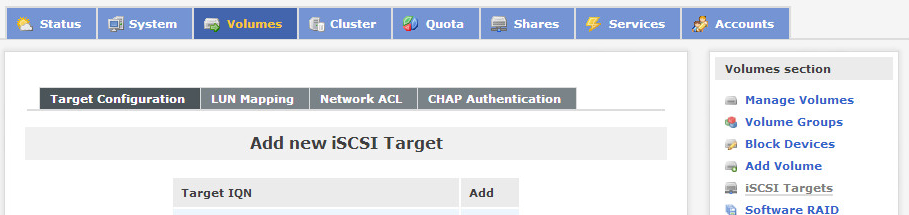
- - Go to Volumes Tab, Click on iSCSI Target in right panel.
- - Click on Target Configuration. You will see Target IQN number, Click Add to make this as new iSCSI Target.
- - Now Click on LUN Mapping tab under same option, and allow Write-thru access to Volumes to map LUN.
- - Click on Network ACL tab and allow access to subnet you added for ESXi hosts. Click on Update, and it's ready for access now. You are just few clicks away before it can be use in ESXi.
Configure iSCSI Target in ESXi Host:-
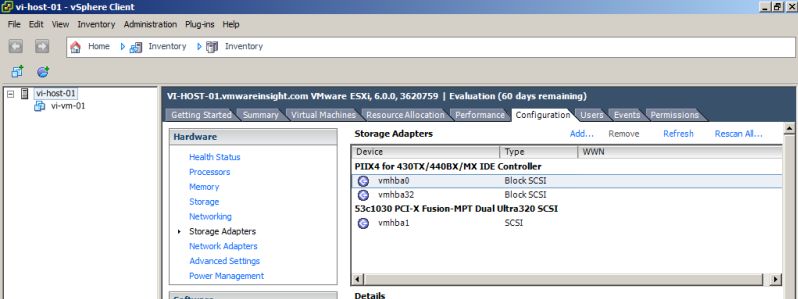
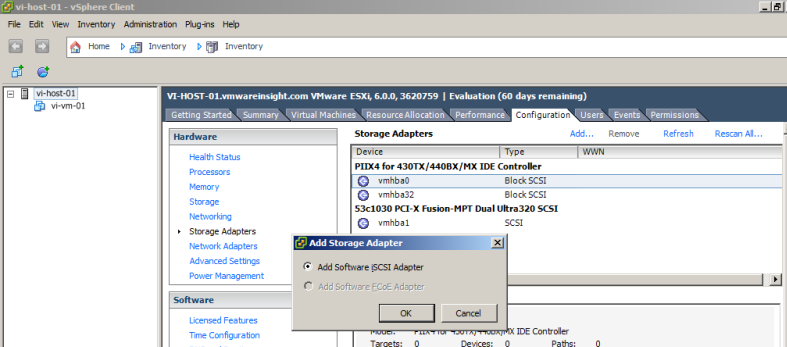
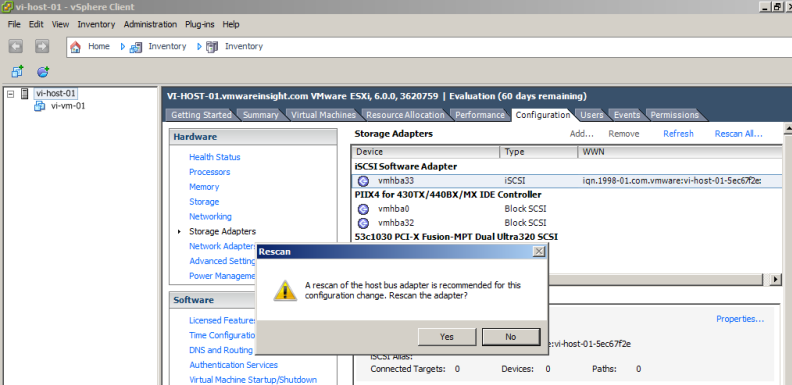
To access iSCSI volumes in ESXi hosts, you have to configure iSCSI adapters and add targets. See below image for available storage adapters in this ESXi hosts. There is no iSCSI adapter exist in host. To add adapter, follow below steps.
- - Login to Host using vSphere Client or through Virtual Center.
- - Select Host as shown below, and Click on Configuration.
- - Go to Storage Adapters in Hardware section.
- - Click on Add.
- - Add Storage Adapter window will appear on screen. Select Add Software iSCSI Adapter. Click OK.
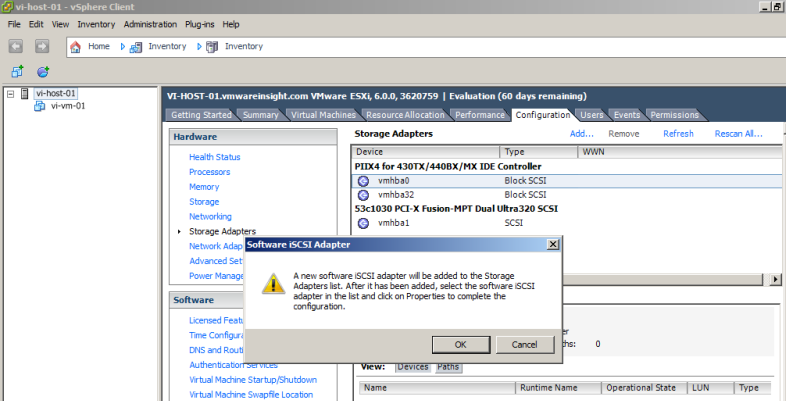
- - It will prompt a warning message, Click OK.
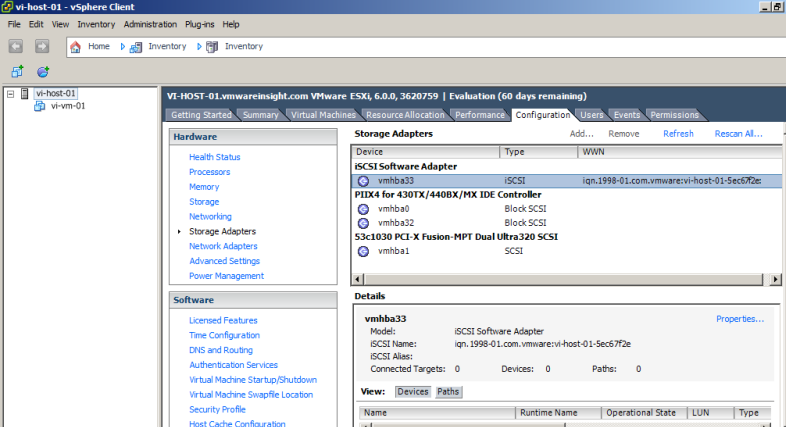
- - See below screen, iSCSI Software Adapter has now enabled and showing as vmhba33. WWN number starting from iqn.
- - Now add target to setup openfiler storage. Select vmhba33 adapter and click on Properties.
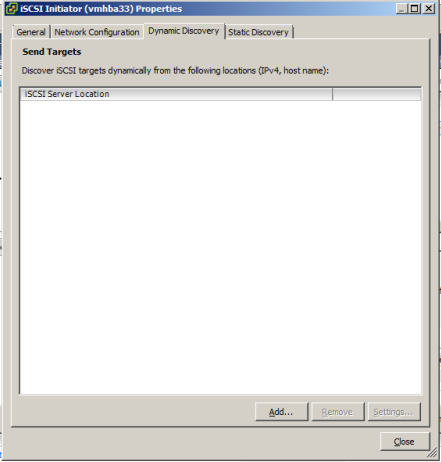
- - iSCSI Initiator Properties window will appear. Click on Dynamic Discovery tab.
- - Click Add.
- - It will ask to provide iSCSI Server IP address. Enter Openfiler IP address here and leave default port as 3260. Click OK.
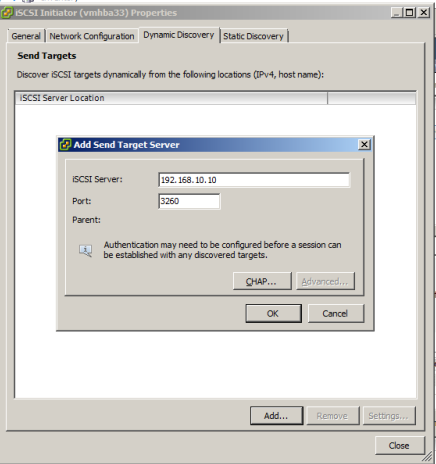
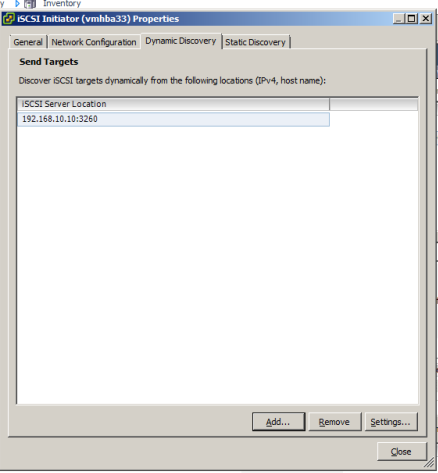
- - As we are doing Dynamic Discovery, it will automatically search targets for exist on this openfiler. Click Close to proceed.
- - Go to General tab and click on CHAP. As we are not using any kind of CHAP authentication, select default option "Do not use CHAP" and Click OK. If you want to use CHAP authentication, you have to configure it in Openfiler console also, then you can choose here.
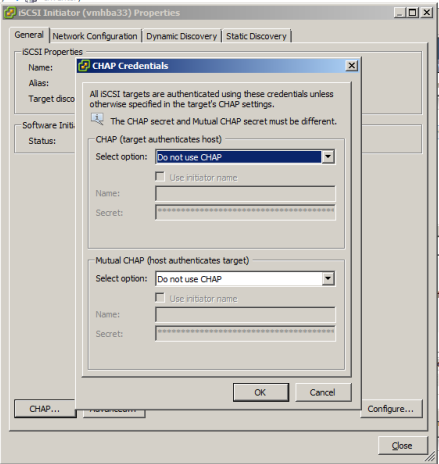
- - Just for information, see below image. These options are available for CHAP settings.
- - Select default options here and click OK, and Close to exit from console.

- - A warning message will appear to rescan HBA. Click on Yes to reflect the configuration changes.
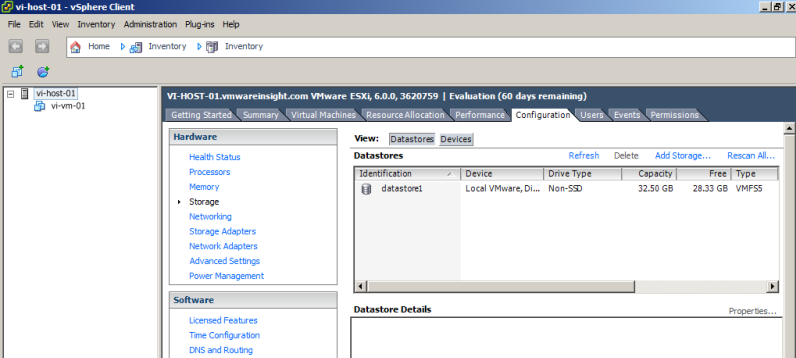
Configure iSCSI Datastores in ESXi Host:-
- - Now targets have been added in ESXi hosts. Proceed to add datastores. Refer below image, there is only one datastore exist which is attached as local datastore.
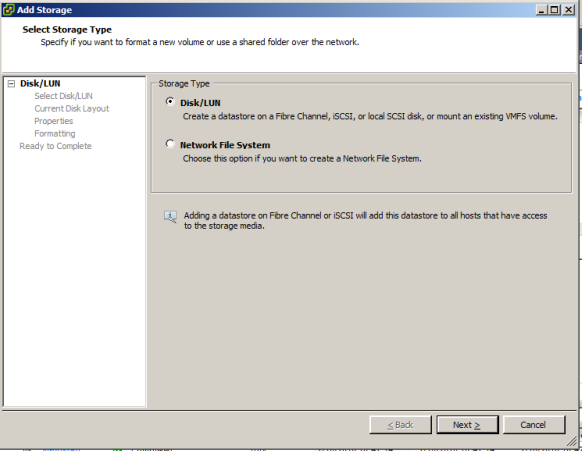
- - Click on Add Storage.
- - Select Disk/LUN and click Next.
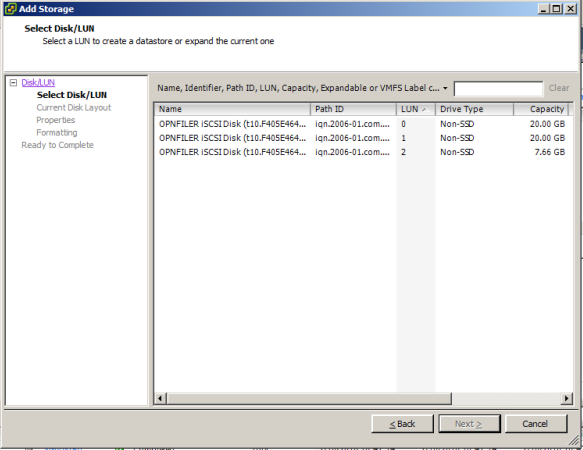
- - It will show available paths and LUNs which you created as iSCSI Volumes in openfiler.
- - Select one LUN and Click Next.
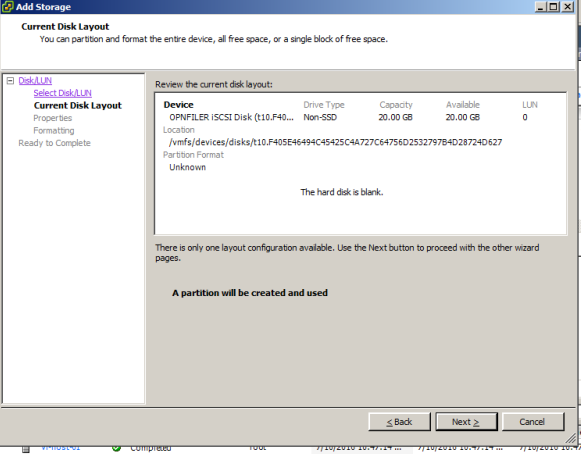
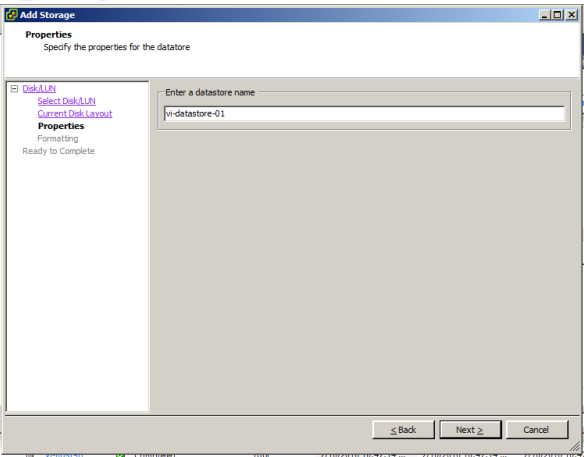
- - Enter Datastore Name and Click Next.
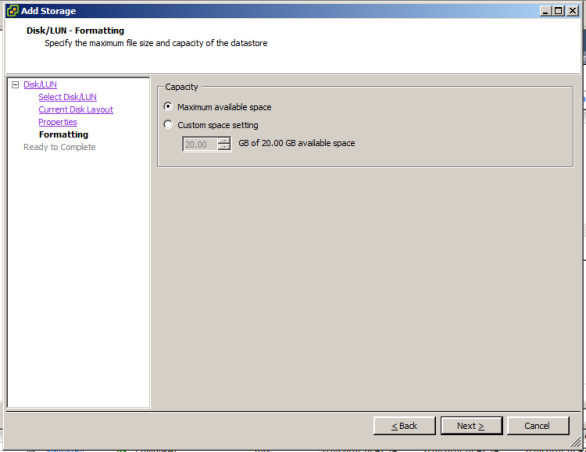
- - Leave Default option for Maximum space and click Next.
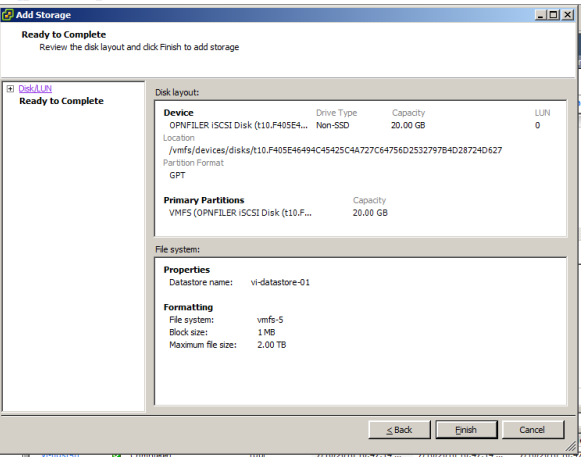
- - Datastore has been created and ready to use. Review the information and Click Finish to complete.
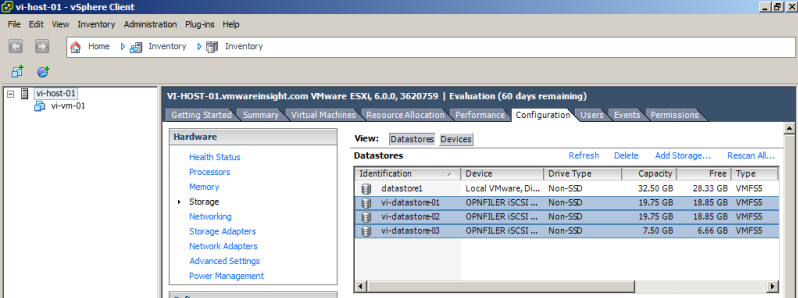
- - Perform same steps to create other datastores. In below example, we have created three datastores. Now these block level iSCSI datastores are ready to use to store files.
Now we are done with configuration of block-level storage. Now let's move to configuration part of File-level storage being shared by Openfiler. To configure this, go back to Openfiler Console and follow below steps.
Configure File-level Storage(NFS)
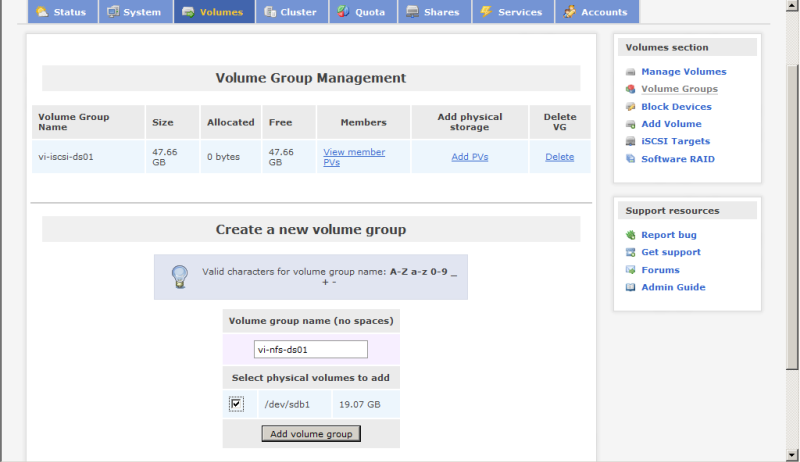
Configure Volume Group for NFS Volumes to use as Shared Storage in ESXi:-
- - Create Volume group for NFS datastore using another volumes. (i;e /dev/sdc1)
- - Click on Volume Groups in right panel to create groups.
- - Give Volume Group Name for NFS volumes in Create a new Volume Group section.
- - Select Physical Volume which you want to use for this group. (/dev/sdc1).
- - Click on Add Volume Group.
Add Volume for NFS:-
- - Go to Volumes tab. Click on Add Volume.
- - Select Volumes Group for NFS, Click on Change.
- - It will prompt to Create a Volume section. Provide required information as shown below.
- - Select Filesystem / Volume type as "XFS" to use this volume as NFS Share. Click Create to proceed.
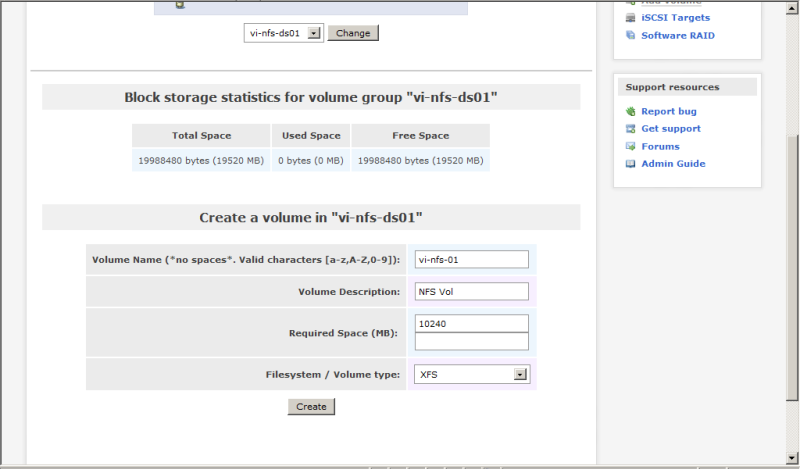
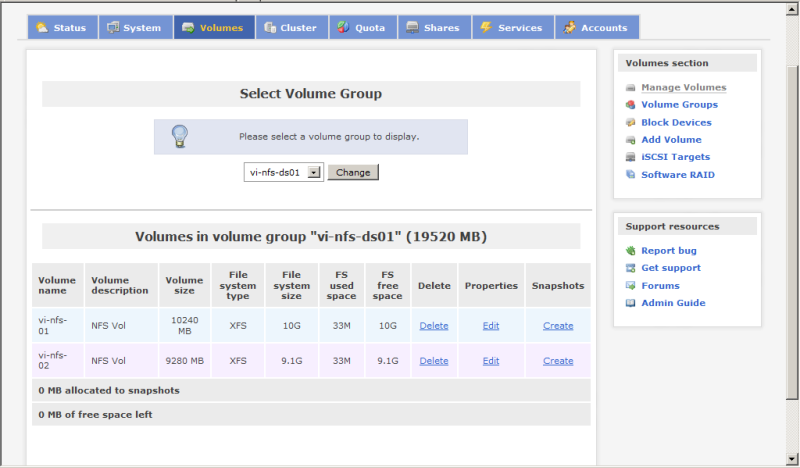
- - Refer below Volumes information, total space for Volume group is 30GB. We created two Volumes called as "vi-nfs-01" and "vi-nfs-02" of approx 10 Gig each. You can create multiple Volumes in single Volume group.
- - Repeat above steps to create more NFS volumes as per requirement.
Create NFS Share to make available to ESXi:-
In previous tasks, you have created NFS Volume Groups and Volumes. Now you have to create NFS shares so that it can be present to ESXi hosts as NFS datastores.
- - Go to Shares tab and click on NFS Volume Groups. In below example, click on NFS Vol, it will prompt to create Share Folder name. Provide share name (e;g Share01). Click on Create Sub-folder.
- - Perform same task for other volumes.
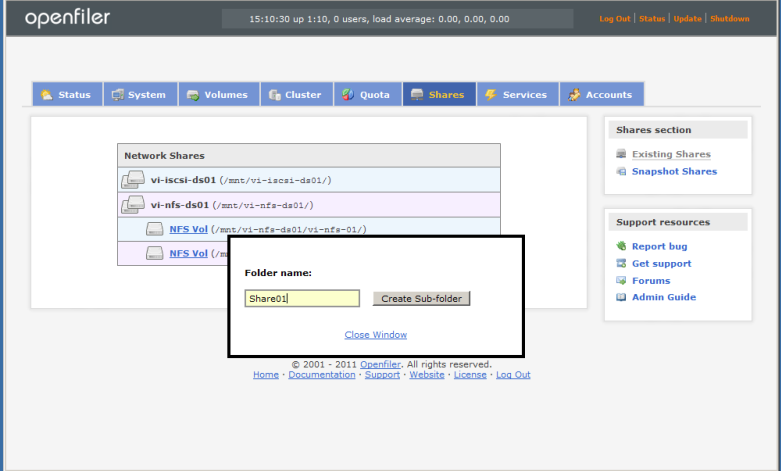
- - See below image for reference, it will be like this after creating NFS Shares.
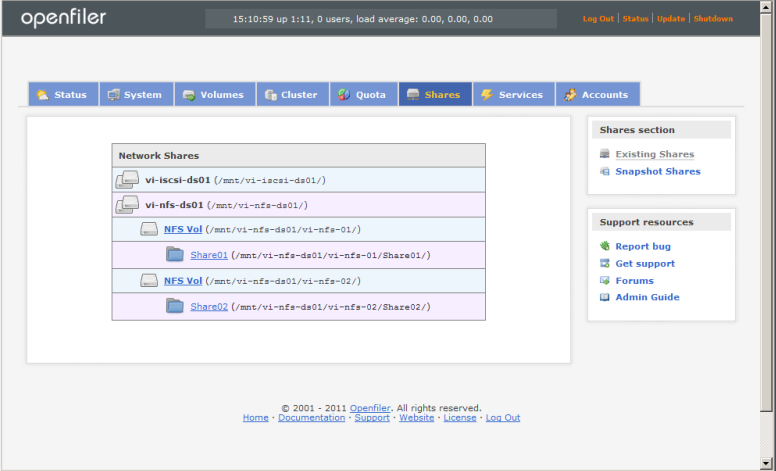
- - Folders have been created under NFS Volumes. Now make it share by clicking on Folder. It will prompt a window, click on Make Share.

- - Select Controlled Access and click on Update.
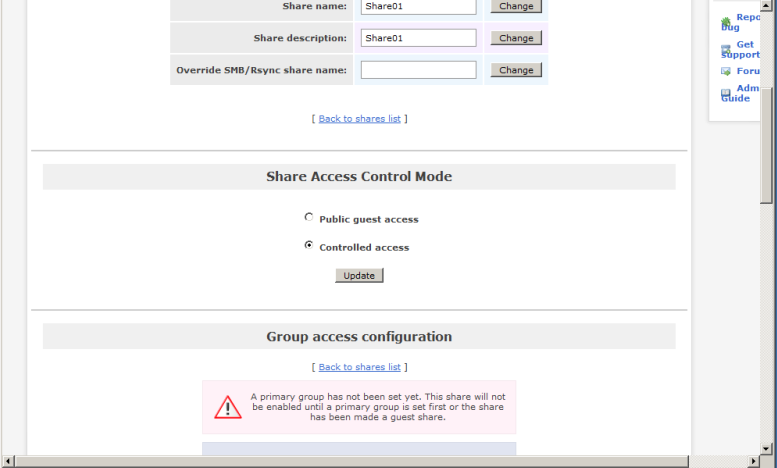
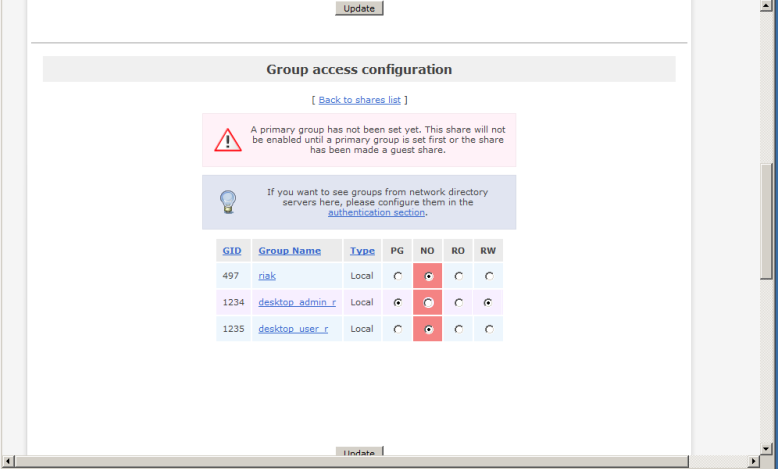
- - When you choose Controlled access above, you have to make Primary Group and have to provide Read/Write permission to this group.
- - Scroll down page and Select desktop_admin as PG and RW as shown below. Click on Update.
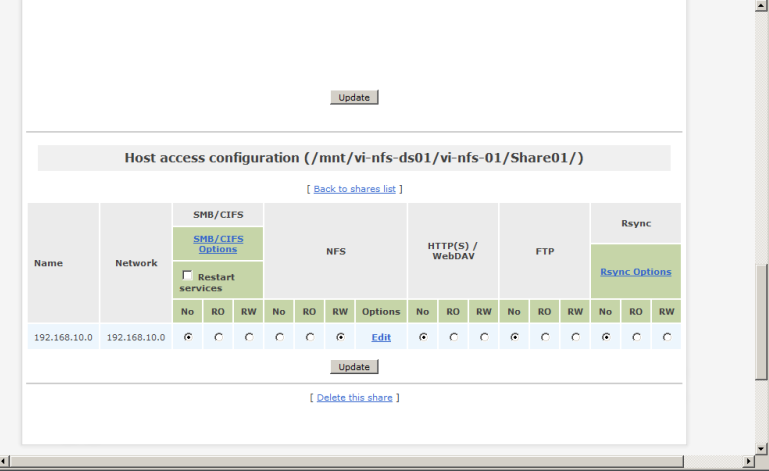
- - Provide access to Host subnet, so that ESXi hosts in that subnet or IP would have access. Scroll down to Host access configuration section, Select host subnet and give Read/Write permission as shown in below figure.
Now it's ready to share in ESXi as NFS datastore. Next step is to login to ESXi Host either through vSphere Client or vCenter Server, and add NFS volume in ESXi hosts.
#Reference: To know about adding NFS volume in ESXi Host, Refer reference article "How to add NFS datastore in ESXi Host"
-----------------------------------------------
Thanks for vising here and giving your time to read out this article. Put your queries or inputs in comment box.
Be social and share if you liked this post.
Join my Facebook Group https://www.facebook.com/groups/VMwareInsight/
Like my Facebook Page https://www.facebook.com/VMwareInsight/